Cass Norville
Jewelry is credited to have begun with Ancient Egyptian legends like Cleopatra. The Egyptians would use jewelry to show social class or just to add a little flair to each outfit. One of the most popular features of jewelry was rings.
As a jewelry fanatic, I understand the fascination. As a hobby, I have begun creating wire rings with my best friend, Brianna. Although I am not as advanced as my dear friend – the rings are actually pretty simple to create. And today, I am going to teach you “How To Do It” (I know, lucky you).
For the materials, you can pick all of this up at Hobby Lobby. For the wire rings you will need:
- Beading wire ($2.99)
- Super glue ($2.99)
- Scissors ($12.99)
- Speed Clamp ($7.99)
And most importantly:
- Patience (priceless)
As someone who is incredibly arts and crafts challenged I understand the frustration that can come with this project. But in the end, it’s worth the hard work.
First, I will begin with something simple. A regular wire band is something subtle and made for us humans that do not like drawing attention to ourselves.
REGULAR BAND:
- Measure the circumference of your finger.
- Cut the wire.
- Wrap the wire around the designated finger and hold the position.
- Apply a small drop of super glue to the two ends of the wire and connect them.
-
- Don’t worry if you use a little too much! Wait until it dries and scrape off the excess glue.
- Remove the ring from your finger gently and attach the clamp to either side of the ring.
-
- Remember not to tighten the clamp too much because you do not want to bend the shape of the ring.
- **If you do bend the ring – don’t panic! The wire band is fairly easy to shape around your finger once it is finished**
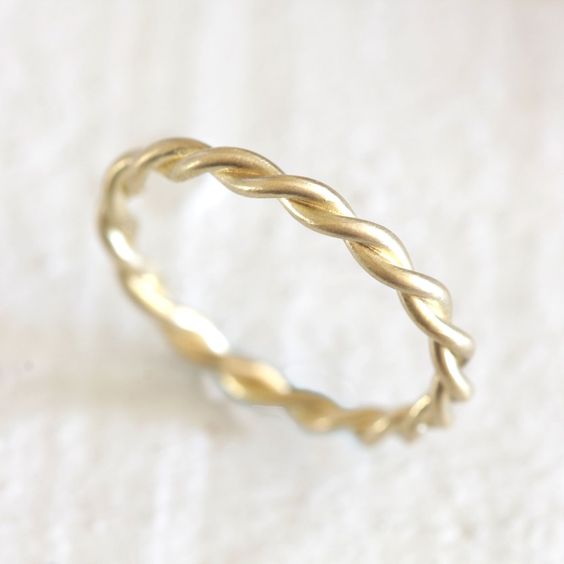
TWISTED RING:
- This ring will require two wires.
- Measure out the height of your finger.
- Cut the wire.
- Repeat steps 1 and 2.
- Take one end of the first and second wire and begin twisting them together (twist the entire length of the wire).
- Take the two ends of the twisted wires and twist them around your finger until they meet together.
- Place a small drop of super glue to the two ends of the wire and connect them.
-
- Don’t worry if you use a little too much! Wait until it dries and scrape off the excess glue.
- 8. Remove the ring from your finger gently and attach the clamp to either side of the ring
- Remember not to tighten the clamp too much because you do not want to bend the shape of the ring.
- **If you do bend the ring – don’t panic! The wire band is fairly easy to shape around your finger once it is finished**
See, it’s simple! Now if you wanted to be a little more “Egyptian” you know how. Although don’t try to be like Cleopatra. Her pet snake went crazy and killed her. But hey, you can’t win them all.
BONUS – TIPS FROM BRIANNA:
- Work on a flat surface with newspaper or some kind of protective sheet underneath.
- I would suggest wearing gloves because the glue can get very sticky.
- Have fun! Crafts are all about having fun while you’re working.